Flask Web 框架中的 OpenCV 人脸检测部署
磐创AI
介绍
本文,我们将介绍使用 Flask API 部署进行人脸检测。OpenCV 是一个 Python 库,旨在解决计算机视觉问题。它用于各种应用,例如人脸检测、视频捕获、跟踪移动对象和对象披露。
Flask API
Flask 是一个广泛使用的微型 Web 框架,用于在 Python 中创建 API。它是一个简单而强大的 Web 框架,旨在快速轻松地启动,并能够扩展到复杂的应用程序。
什么是 Haarcascade
它是一种对象检测算法,用于识别图像或实时视频中的人脸。该算法使用边缘或线检测特征。

现在让我们进入项目实现。
项目结构

index.html
<!DOCTYPE html>
<html>
<link rel="stylesheet" href="https://maxcdn.bootstrapcdn.com/bootstrap/3.4.1/css/bootstrap.min.css">
<title>Dharmaraj - Face Detection</title>
<style>
h2
{
padding-bottom:20px;
font-weight: 600;
font-size: 3.2em
}
</style>
<body>
<div class="container"><center><h2>Face Detection</h2></center>
<div class="col-lg-offset-2 col-lg-8">
<center><form class="form-inline" action = "/stop" method = "post" enctype="multipart/form-data">
<input type = "submit" class="btn btn-danger btn-md btn-block" value="Stop">
</form></center>
<center><form class="form-inline" action = "/start" method = "post" enctype="multipart/form-data">
<input type = "submit" class="btn btn-success btn-md btn-block" value="Start">
</form></center><br></div>
<div class="col-lg-offset-2 col-lg-8">
<img src="{{ url_for('video_capture') }}" width="100%">
</div></div>
</body>
</html>
stop.html
<!DOCTYPE html>
<html>
<link rel="stylesheet" href="https://maxcdn.bootstrapcdn.com/bootstrap/3.4.1/css/bootstrap.min.css">
<title>Dharmaraj - Face Detection</title>
<style>
h2
{
padding-bottom:20px;
font-weight: 600;
font-size: 3.2em
}
</style>
<body>
<div class="container">
<center><h2>Face Detection</h2></center>
<div class="col-lg-offset-2 col-lg-8">
<center><form class="form-inline" action = "/stop" method = "post" enctype="multipart/form-data">
<input type = "submit" class="btn btn-danger btn-md btn-block" value="Stop">
</form></center>
<center><form class="form-inline" action = "/start" method = "post" enctype="multipart/form-data">
<input type = "submit" class="btn btn-success btn-md btn-block" value="Start">
</form></center><br>
</div></div>
</body>
</html>
app.py
from flask import Flask, render_template, Response
import cv2
app=Flask(__name__)
def capture_by_frames():
global camera
camera = cv2.VideoCapture(0)
while True:
success, frame = camera.read() # read the camera frame
detector=cv2.CascadeClassifier('Haarcascades/haarcascade_frontalface_default.xml')
faces=detector.detectMultiScale(frame,1.2,6)
#Draw the rectangle around each face
for (x, y, w, h) in faces:
cv2.rectangle(frame, (x, y), (x+w, y+h), (0, 255, 0), 3)
ret, buffer = cv2.imencode('.jpg', frame)
frame = buffer.tobytes()
yield (b'--frame'
b'Content-Type: image/jpeg' + frame + b'')
@app.route('/')
def index():
return render_template('index.html')
@app.route('/start',methods=['POST'])
def start():
return render_template('index.html')
@app.route('/stop',methods=['POST'])
def stop():
if camera.isOpened():
camera.release()
return render_template('stop.html')
@app.route('/video_capture')
def video_capture():
return Response(capture_by_frames(), mimetype='multipart/x-mixed-replace; boundary=frame')
if __name__=='__main__':
app.run(debug=True,use_reloader=False, port=8000)
结果
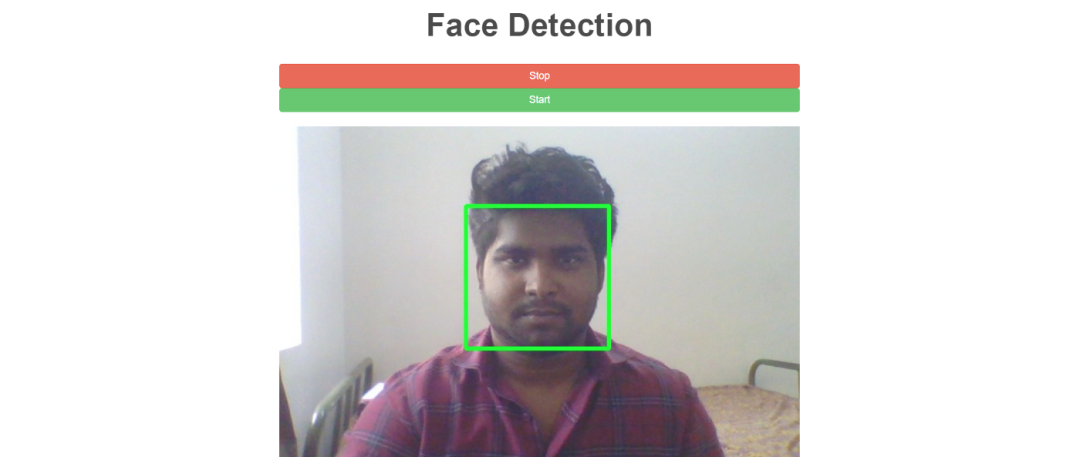
运行此代码后,你将看到以下屏幕。

复制此 URL http://127.0.0.1:8000/ 并将其粘贴到浏览器中以获取结果。


