如何使用Python+OpenCV+Keras实现无口罩车辆驾驶员惩罚生成
磐创AI介绍
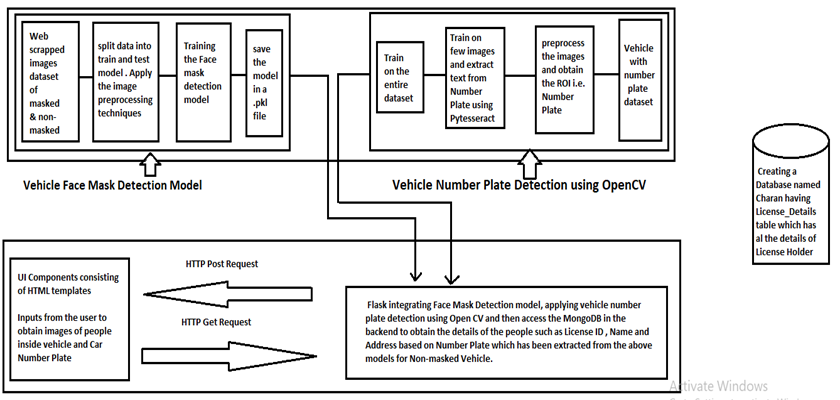
我们知道,在当前形势下,我们正在逐步稳定地克服大流行病的情况,而且情况每天都在改善。但是,众所周知,即使已经开始接种疫苗,彻底根除该病毒仍需花费很多年。因此,为安全起见,在接下来的几年中,我们所有人都可能会习惯于戴口罩。就违反交通规则而言,政府仍然严格对在路上开车不戴口罩的人处以罚款。建立一个系统,能够追踪所有交通违法者的细节,提高公民的意识和纪律,是一个非常有用的办法。还可以通过另外创建一个仪表板监视程序来跟踪该交通规则违反者的增加或减少,在给定期间内收集罚款,确定主要违反规则的人群,从而改善该系统。工作范围作为代码实现的一部分,我们计划设计一个模型,将图像分类为戴口罩的和没戴口罩的。对于获得的属于没戴口罩类别的图像,我们获取车辆号牌的图像,并尝试提取车辆详细信息。车牌识别使用第二个模型完成,该模型接收带有车牌的输入作为汽车图像。一旦完成了车辆ID,我们便将详细信息传递到虚拟数据库,该数据库包含车牌持有人的数据以及车辆的详细信息。根据数据验证,我们将产生罚款,该罚款将直接发送到违规者的家庭住址。软件架构

网页抓取图片

项目始于确定要使用的数据集的问题。在我们的项目中,在线冲浪几乎无法为我们提供可用于我们项目的现有数据集。因此,我们决定应用网络抓取收集戴口罩和没戴口罩的图像。我们使用Beautiful Soap and Requests库从网站下载图像并将其保存到包含戴口罩和没带口罩驾驶员的不同文件夹中。我们从下面的URL中提取了数据,这些URL由已屏蔽图像和未屏蔽图像组成。链接url1 = https://www.gettyimages.in/photos/driving-mask?page=链接url2 = https://www.gettyimages.in/photos/driving-without-mask?page=下面是一段代码,演示了Web上的图像抓取。from bs4 import *
import requests as rq
import os
url1 = 'https://www.gettyimages.in/photos/driving-mask?page='
url2 = '&phrase=driving%20mask&sort=mostpopular'
url_list=[]
Links = []
for i in range(1,56):
full_url = url1+str(i)+url2
url_list.append(full_url)
for lst in url_list:
r2 = rq.get(lst)
soup = BeautifulSoup(r2.text, 'html.parser')
x=soup.select('img[src^="https://media.gettyimages.com/photos/"]')
for img in x:
Links.append(img['src'])
print(len(Links))
for index, img_link in enumerate(Links):
if i <= len(Links):
img_data = rq.get(img_link).content
with open("Masked_Drivers/" + str(index + 1) + '.jpg', 'wb+') as f:
f.write(img_data)
i += 1
图像预处理在将图像发送到模型之前,我们需要应用一些清理技术,例如图像大小调整图像的灰度和将像素重新缩放为较低的值。之后,图像和目标将保存在阵列中。import cv2,os
data_path='Dataset'
categories=os.listdir(data_path)
labels=[i for i in range(len(categories))]
label_dict=dict(zip(categories,labels)) #empty dictionary
print(label_dict)
print(categories)
print(labels)
img_size=100
data=[]
target=[]
img_size=100
data=[]
target=[]
for category in categories:
folder_path=os.path.join(data_path,category)
img_names=os.listdir(folder_path)
for img_name in img_names:
img_path=os.path.join(folder_path,img_name)
img=cv2.imread(img_path)
try:
gray=cv2.cvtColor(img,cv2.COLOR_BGR2GRAY)
#Coverting the image into gray scale
resized=cv2.resize(gray,(img_size,img_size))
#resizing the gray scale into 50x50, since we need a fixed common size for all the images in the dataset
data.append(resized)
target.append(label_dict[category])
#appending the image and the label(categorized) into the list (dataset)
except Exception as e:
print('Exception:',e)
import numpy as np
data=np.array(data)/255.0
data=np.reshape(data,(data.shape[0],img_size,img_size,1))
target=np.array(target)
from keras.utils import np_utils
new_target=np_utils.to_categorical(target)
np.save('data',data)
np.save('target',new_target)
建立模型在这里,我们使用Keras的Sequential设计CNN模型。使用大约200个神经元作为输入来构建CNN。应用激活函数和最大池化技术后,我们将获得另一组输出特征,这些特征将通过Conv2D的另一层传递。最后,我们从softmax中获得2个输出,它们代表输入图像的戴口罩或未戴口罩状态。from keras.models import Sequential
from keras.layers import Dense,Activation,Flatten,Dropout
from keras.layers import Conv2D,MaxPooling2D
from keras.callbacks import ModelCheckpoint
model=Sequential()
model.add(Conv2D(200,(3,3),input_shape=data.shape[1:]))
model.add(Activation('relu'))
model.add(MaxPooling2D(pool_size=(2,2)))
model.add(Conv2D(100,(3,3)))
model.add(Activation('relu'))
model.add(MaxPooling2D(pool_size=(2,2)))
model.add(Flatten())
model.add(Dropout(0.5))
model.add(Dense(50,activation='relu'))
model.add(Dense(2,activation='softmax'))
model.compile(loss='categorical_crossentropy',optimizer='adam',metrics=['accuracy'])
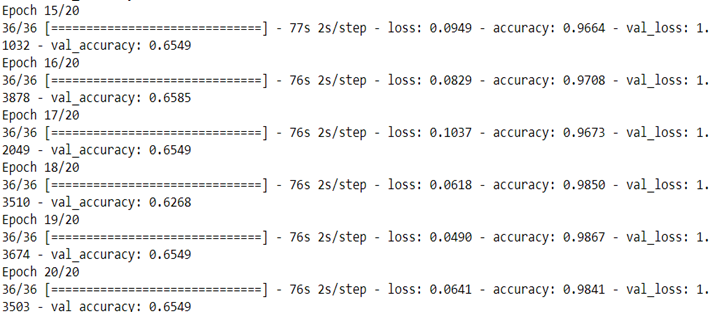
训练和测试模型构建CNN模型后,我们将数据分为训练集和测试集。后来,我们通过设置各种参数(例如时期,训练集,验证集和验证拆分值),在训练和测试数据上拟合CNN模型。from sklearn.model_selection import train_test_split
train_data,test_data,train_target,test_target=train_test_split(data,target,test_size=0.4)
checkpoint = ModelCheckpoint('model-{epoch:03d}.model',monitor='val_loss',verbose=0,save_best_only=True,mode='auto')
history=model.fit(train_data,train_target,epochs=20,callbacks=[checkpoint],validation_split=0.1)

1 2 3 4 下一页>

