如何在添加图像时自动选择背景?
磐创AI有没有想过 Instagram 如何在你添加图像时自动选择背景?!
他们通过不同的算法分析你的图片并生成与图像匹配的背景。他们主要使用图像中存在的“颜色”来处理输出。
在本文中,你可以找到 2 种技术来检测输入图像的合适背景。在最终用户产品中使用这些算法时,这些方法有点幼稚,但对于学习新东西的开发人员来说,这些方法非常方便且易于复制。
让我们了解第一种方法
在这种情况下,我们只需将RGB矩阵分离为单独的颜色通道,然后使用Counter() 函数分别对3个RGB矩阵中的每个像素值进行频率计数。
然后,选择10个出现频率最高的值并取它们的平均值来获得结果像素值。
最后,只需使用np.zeros() 生成一个空白图像,并用获得的背景色填充它即可显示最终结果。这种技术只需40行代码就可以产生结果!
以下是第一种方法的完整代码:
import numpy as np
from collections import Counter
file_path='YOUR_FILE_PATH'
def find_background(path=None):
if(path is not None):
img=cv2.imread(path)
img=cv2.resize(img,(800,600))
blue,green,red=cv2.split(img)
blue=blue.flatten()
green=green.flatten()
red=red.flatten()
blue_counter=Counter(blue)
green_counter=Counter(green)
red_counter=Counter(red)
blue_most=blue_counter.most_common(10)
blue_avg=[i for i,j in blue_most]
blue_avg=int(np.mean(blue_avg)
green_most=green_counter.most_common(10)
green_avg=[i for i,j in green_most]
green_avg=int(np.mean(green_avg))
red_most=red_counter.most_common(10)
red_avg=[i for i,j in red_most]
red_avg=int(np.mean(red_avg))
background=[blue_avg,green_avg,red_avg]
bg=np.zeros((512,512,3),np.uint8)
bg_color=cv2.rectangle(bg,(0,0),(512,512),background,-1)
return(bg_color)
else:
return(None)
bg_image=find_background(file_path)
cv2.imshow('Image',img)
cv2.imshow('Background',bg_image)
cv2.waitKey(0)
cv2.destroyAllWindows()
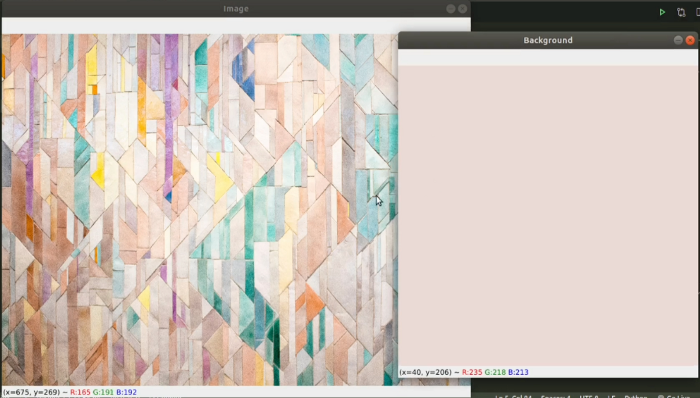
我们得到的原始图像和由此产生的背景颜色
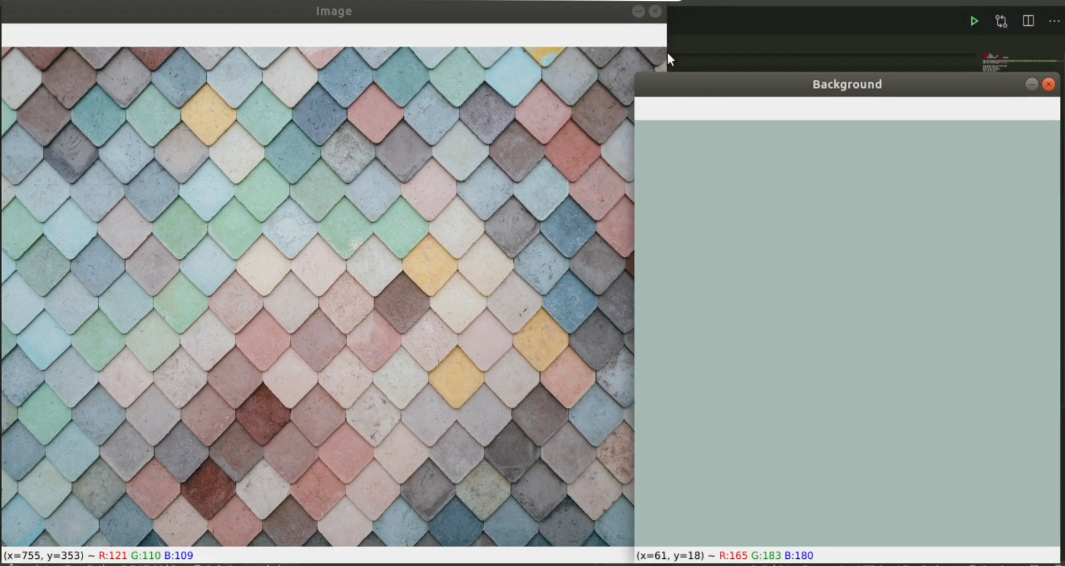
获得的原始图像和由此产生的背景颜色
什么是更复杂的方法来做到这一点?“ML”在哪里?!
实现相同目标的另一种方法是使用机器学习算法为我们提供我们想要计算最频繁的颜色分离。
第二种方法对 RGB 值使用 K-Means 聚类算法,并找出图像中存在的一组不同颜色的聚类。之后,再次利用频率计数,最后找到背景色。这种方法涉及到无监督机器学习的使用,其应用范围远远超出了背景颜色检测。
图像分割任务大量使用这种方法对图像进行K均值聚类。
以下是K-Means方法的完整代码:
import numpy as np
from collections import Counter
from sklearn.cluster import KMeans
import matplotlib.pyplot as plt
img=cv2.imread('YOUR_FILE_NAME')
img=cv2.resize(img,(500,500))
plt.imshow(cv2.cvtColor(img, cv2.COLOR_BGR2RGB))
#Reshaping into a R,G,B -(2x3) 2D-Matrix
modified_img=img.reshape(img.shape[0]*img.shape[1],3)
#print(modified_img)
#plotting all the points in 3D space.
x=modified_img[:,0]
y=modified_img[:,1]
z=modified_img[:,2]
fig = plt.figure(figsize=(5,5))
ax = plt.axes(projection ='3d')
ax.scatter(x, y, z)
plt.show()
# Performing unpsupervised learning using K-Means
kmean=KMeans(n_clusters=10)
labels=kmean.fit_predict(modified_img)
#print(kmean.labels_)
#Points as shown according to the labels of KMeans
x=modified_img[:,0]
y=modified_img[:,1]
z=modified_img[:,2]
fig = plt.figure(figsize=(7, 7))
ax = plt.axes(projection ='3d')
ax.scatter(x, y, z, c=kmean.labels_, cmap='rainbow')
ax.scatter(kmean.cluster_centers_[:,0] ,kmean.cluster_centers_[:,1],kmean.cluster_centers_[:,2], color='black')
plt.show()
#Making frequency of each label set i.e count of no. of data-points in each label
count=Counter(labels)
center_color=kmean.cluster_centers_
ordered_color=[center_color[i] for i in count.keys()]
def rgb2hex(color):
return "#{:02x}{:02x}{:02x}".format(int(color[0]),
int(color[1]), int(color[2]))
hex_color=[rgb2hex(ordered_color[i]) for i in count.keys()]
plt.figure(figsize = (8, 6))
plt.pie(count.values(),labels=hex_color,colors=hex_color,shadow=True)
def get_key(val):
for key,value in count.items():
if val==value:
return key
return "key doesn't exist"
# Getting the max. color as our background
label_background=get_key(max(count.values()))
background_color=ordered_color[label_background]
hex_color_background=rgb2hex(background_color)
#showing our background in the form of an image.
bg=np.zeros((512,512,3),np.uint8)
bg_color=cv2.rectangle(bg,(0,0),(512,512),background_color,-1)
plt.imshow(bg_color)
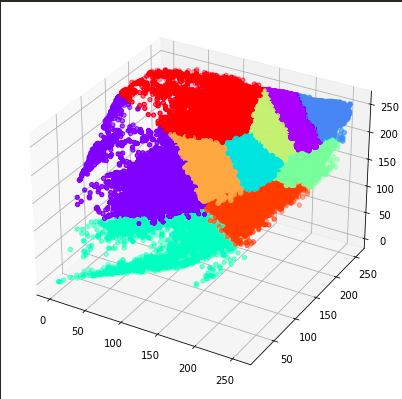
所有不同颜色的 3D 绘图
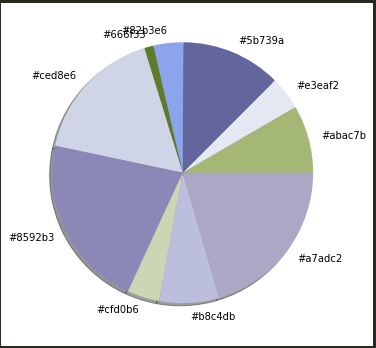
最常见颜色的饼图
结论
通过本文,向你展示了两种技术,你可以在其中使用非常简单的算法获取图像的背景。
